Showing posts with label Art. Show all posts

Saturday, December 17, 2011

Rainbow Shatter


What I used:
OPI Black Shatter
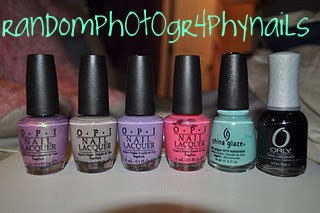
OPI Feelin' Hot-Hot-Hot (Pink)
OPI Do You Lilac It? (Purple)
China Glaze White on White (White)
China Glaze For Audrey (Blue)
China Glaze Tree Hugger (Green)
Illamasqua Wayward (Yellow)
Makeup Sponge Chunks
Palette


1. Always use a base coat.
2. Start off with one coat of white. It doesn't need to be solid, just one layer is ok so the other color will show better. Let it dry.

**You can use any colors you want, but it is best to stick to lighter colors. I used pink, purple, blue, green & yellow.

3. Put a couple of drops of your first color onto the palette.
4. Using the makeup chunk, dab it in the color then stipple it onto a small portion of your nail. Let it dry, this is important because if it isn't dry it will blend with the other colors.

**It is a lot easier if you make you sponge chunks smaller and longer and with a semi-pointed edge.

5. Repeat 3 & 4 with the remainder of your colors in a new area of the nail, sometimes overlapping the previous color(s). You can choose to leave a white portion or you can cover it completely.
6. Once you've finished with the colors and it has dried use your one coat of your shatter polish. You can use any color shatter including gold and silver but I think that the black offers the best contrast.

**Hint: a thick layer of shatter will give you bigger chunks while a thin layer will give you thinner and finer lines. Be quick though the shatter gets chunky when exposed for too long.

7. Finish with a top coat.

Tuesday, December 13, 2011

Red & White Dot Tips


What I used:
OPI The Thrill of Brazil (red)
China Glaze White on White (white)
Finger Paint Easel Come, Easel Go (silver)
Essie Sugar Daddy (light pink)
Striping Brush
Dotting Tool
Scotch Tape

**DISCLAIMER: I found this on youtube then added my own little spin. http://www.youtube.com/watch?v=KXd_nxlEuKA thank you cutepolish!! :)


1. Always use a base coat.
2. I used one coat of Essie Sugar Daddy. Let it dry completely.
3. Take a strip of scotch tape and stick it on your palm once so it's not too sticky, then apply it onto your nail diagonally. (**hint: press down only half of the tape onto the nail then pop up the edge not stuck to your nail so it would be less likely to lift up. Make sure you press it down at the sides too.)
4. Use 2 coats of your base color. I used OPI The Thrill of Brazil. Let it dry.
5. Using your biggest dotting tool and your dots color, randomly dot the painted area. I used China Glaze White on White.
6. With the striping tool and and your stipe color draw the stripe under the painted area. Let everything dry. I used Finger Paints Easel Come, Easel Go.
7. Finish with a top coat.

Thursday, December 8, 2011

Snowing Snowman

  
What I used:
Nicole by OPI Razzle Dazzler (black, solid)
OPI Russian Navy (bottle looks dark purple but is really dark blue, shimmery)
OPI The Thrill of Brazil (red, solid)
China Glaze Sexy in the City (blue, shimmery)
China Glaze White on White (white, solid)
Essie Loophole (silver)
Essie Sugar Daddy (light pink, translucent)
China Glaze Lorelei's Tiara (silver & blue glitter)
China Glaze Fairy Dust (holographic glitter)
Palette
Sponge Chunks
Dotting Tools
Art Club Nail Art Gold Hologram Stars

**This is a time consuming project. You can not rush it.


**When you switch colors use a new sponge or switch it to and unused side.

***This is technically a 3-in-1 project you can put your own spin on it and do only the blue nails or only the snowman nails or you can do what I did and mix it together :)

Blue Nails:
1. Always use a base coat.
2. Then paint 1 coat of light pink. I used Essie Sugar Daddy. Let it dry.
3. On the palette put a couple of drops of silver. I used Essie Loophole.
4. Take a piece of sponge and lightly dip into the silver taking the excess by dabbing to the side of the polish.
5. Gently start from the tip and work your way down leaving 1-2 cm untouched by the silver. It should be super light. Let it dry.
6. Now repeat steps 1-3 but only going half way of the silver with blue. I used China Glaze Sexy in the City. Let it dry.
7. Repeat steps 1-3 again but stick to the very tips of your nails with dark blue. I used OPI Russian Navy. Let it dry.
8. Repeat steps 1-3 one more time with glitter. I used China Glaze Lorelei's Tiara.
9. Finish with a top coat.

Snowman Nails:

1. Always use a base coat.
2. Then paint 1 coat of light pink. I used Essie Sugar Daddy. Let it dry.
3. On the palette put a couple of drops of silver. I used Essie Loophole.
4. Take a piece of sponge and lightly dip into the silver taking the excess by dabbing to the side of the polish.
5. Gently start from the tip and work your way down leaving 1-2 cm untouched by the silver. It should be super light. Let it dry.
6. Now repeat steps 1-3 but only going half way of the silver with white. I used China Glaze White on White. Let it dry.
**Snowman time!
7. Using the biggest dotting tool create the body with white (I used China Glaze White on White) with a bigger circle on the bottom a smaller circle on top, leave a small space in between the two. Drawing these two circles you will have to make them bigger than what the dotting tool makes. Let it dry.
8. Using the biggest dotting tool make the eyes with black (I used Orly Liquid Vinyl) in the middle of the top circle and with the smallest dotting tool make 2 buttons with black on the bottom circle. With a medium dotting tool free hand draw the hat.
9. With a medium dotting tool make the inside eye circle with white.
10. With a medium dotting tool make the scarf free hand. I used OPI The Thrill of Brazil but you can use any color of your choice. Let it dry completely so it won't smear.
**Star time.
11. Using a dotting tool but a dot of clear polish on the side of the snowman, pick up the star and drop it on the clear polish while still wet.
12. Apply as many as you like.
13. Finish with a top coat. 

**DISCLAIMER: I found this on youtube then added my own little spin. http://www.youtube.com/watch?v=CBhzpiTNvPM Again, thank you IHaveACupcake!! :)

Bumble Bee buzzzzz :)


 What I used:
China Glaze Secret Peri-Wink-Le (blue)
China Glaze White on White (white)
Illamasqua Wayward (Yellow)
Nicole by OPI Razzle Dazzler
Palette
Dotting Tool


This is a super cute project I did on my friend's nails. It's simple and fun :)

1. Always use a base coat.
2. Paint 2 coats of blue. I used China Glaze Secret Peri-Wink-Le
3. With a large dotting tool draw a horizontal oval on the middle finger for the body. Then draw 2 smaller vertical ovals on the top for the wings and a small line for the stinger. Last use a small dotter to draw a trail of dots. I used Nicole by OPI Razzle Dazzler.
4. With a medium dotting tool draw 2 yellow stripes on the body with yellow. I used Illamasqua Wayward.
5. With a small dotter make the eyes with white. I used China Glaze White on White.
6. Finish with a top coat! Yay!

Wednesday, December 7, 2011

Leopard Print


 What I Used:
OPI Significant Other Color (the bottle is the gold shimmer purple but it comes out super light/translucent)
OPI French Quater for Your Thoughts (light grey)
OPI Do You Lilac It? (purple)
OPI Feelin' Hot-Hot-Hot (pink)
China Glaze For Audrey (robin's egg)
Orly Liquid Vinyl (black)
Dotting Tool


This is a super cute flirty project :) It's one of my favorites so far.

1. Always use a base coat.
2. For the base you can use and color for the base color. I used OPI French Quarter for Your Thoughts for the first and OPI Significant Other Color for the second. With the color of your choice paint 2 coats.
3. For the spots you can use any color as well. I Used OPI Do You Lilac It? OPI Feelin' Hot-Hot-Hot and China Glaze For Audrey. With the biggest dotting tool randomly dot you nails with you chosen colors.
4. With a small-medium dotting tool with black (I used Orly Liquid Vinyl) draw wonky C's and brackets around the spots.
5. Finish with a top coat.

Rawr. You're looking fierce. :) yupp I'm just that tacky :)

Fading Color Nails


What I used: 
Essie's Sugar Daddy (light pink)
Essie's Loophole (silver)
Orly's Liquid Vinyl (black)
OPI's Meet Me on the Star Ferry (pink/purple)
**Ideally for the silver, black and pink you can use any colors you want**
Makeup triangle sponge (ripped into little chunks)
Paper plate or an Old CD/DVD 

**This is a time consuming project. You can't rush it.

Always start with a base coat before you start a project :) After the base coat I used 2 coats Essie's Sugar Daddy. It comes out as a super light translucent pink.
Now wait till the pink dries, it should not be tacky or wet.

**When you switch colors use a new sponge or switch it to and unused side.

Now for the fun part (she said ominously):
1. On the plate/CD/DVD put a couple of drops of silver
2. Take a piece of sponge and lightly dip into the silver taking the excess by dabbing to the side of the polish
3. Gently start from the tip and work your way down leaving 1-2 cm untouched by the silver. It should be super light.
4. Repeat steps 2 & 3 each time leaving more space untouched.
5. Now take the color of your choice (I used Orly's Liquid Vinyl for the top picture and OPI's Meet Me on the Star Ferry for the bottom picture) and repeat steps 1-4 but only going half way or even just the tips.

Let everything dry and use a top coat and voilĂ ! C'est magnifique. You're done!